Showing posts with label Finish. Show all posts

Panduan Pemula: Cara Menggunakan Virtualbox untuk Instalasi Windows dan OS Lain

July 27, 2018 Add Comment

Virtualbox adalah sebuah mesin virtual bersifat open source yang berfungsi sebagai mesin virtualisasi untuk menginstall OS (Operation System) sehingga memungkinkan anda untuk menjalankan beberapa OS tanpa harus dual boot dan tanpa harus takut kehilangan data sistem anda.

Hal ini penting jika anda ingin melakukan uji coba atau simulasi instalasi sebuah sistem operasi. Dan pada kesempatan ini saya akan menjelaskan bagaimana cara menggunakan virtualbox ini, mulai dari proses instalasi sampai pada pembuatan virtual machine. Baiklah lansung saja kita bahas satu per satu.

A. Instalasi VirtualBox

1. Download Virtual Box
Pertama sebelum kita melakukan instalasi, tentu kita harus mendownload file instalasi virtual box terlebih dahulu, anda dapat mendownloadnya secara gratis melalui link berikut ini. Pilih paket sesuai dengan sistem operasi yang anda gunakan dan kemudian download.

2. Install virtualbox
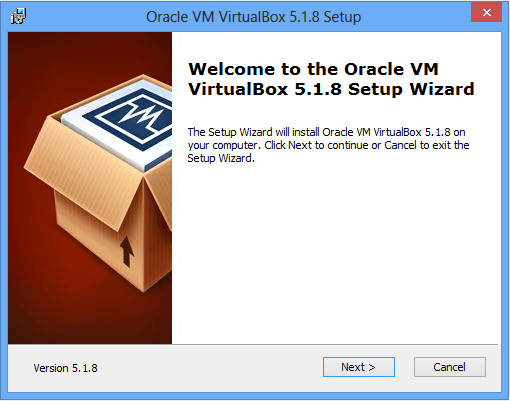
Setelah selesai download, lakukan install virtualbox anda dengan mengklik dua kali file exe sehingga jendela selamat datang (Welcome to the Oracle VM VirtualBox 5.1.8 Setup Wizard ) terbuka. Klik Next >.


3. Memilih Fitur yang Diinstal
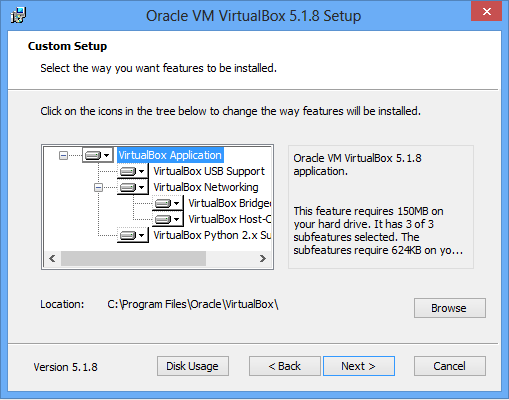
Pada jendela Custom Setup, gunakan pengaturan defaultnya saja. Kemudian klik Next >.

4. Opsi Pilihan Shortcut
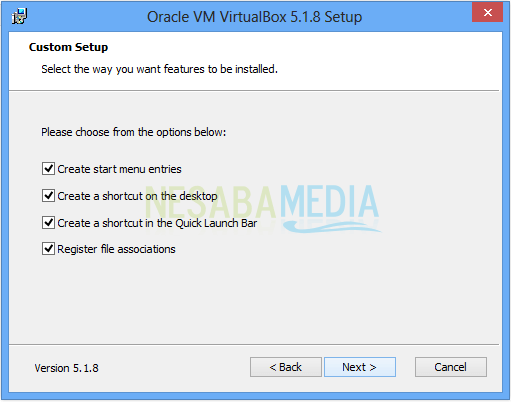
Pada jendela selanjutnya terdapat beberapa opsi pilihan mengenai shortcut untuk mengakses virtual box anda. Silahkan checklist semua lalu kemudian klik Next >.

5. Peringatan Network Interfaces
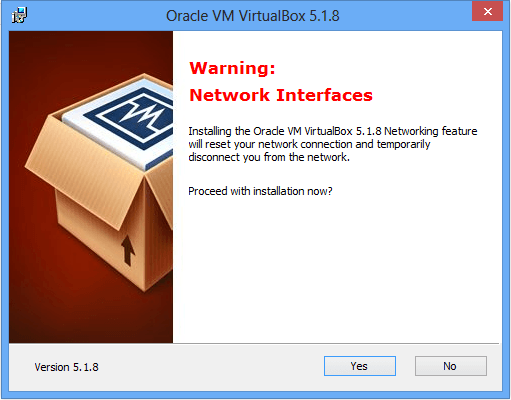
Di jendela berikutnya akan muncul peringatan bahwa untuk menginstal fitur Virtual Box Networking akan memutuskan anda dari koneksi jaringan untuk sementara. Bila anda setuju anda dapat melanjutkan instalasi dengan mengklik Yes.

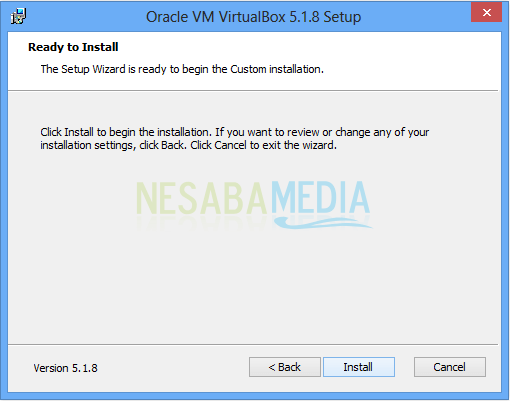
6. Ready to Install
Pada jendela terakhir, virtualbox anda telah siap untuk di install. Untuk menyelesaikannya klik Install dan tunggu hingga proses instalasi selesai.

7. Installation Is Complete
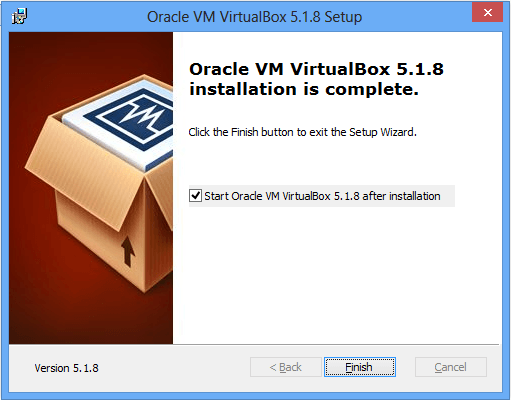
Setelah proses instalasi selesai pada bagian terakhir terdapat pemberitahuan bahwa proses instalasi telah selesai. Untuk membuka Virtualbox anda, silakan checklist “Start Oracle VM Virtualbox 5.18 After Installation” dan klik Finish.


B. Membuat Virtual Machine

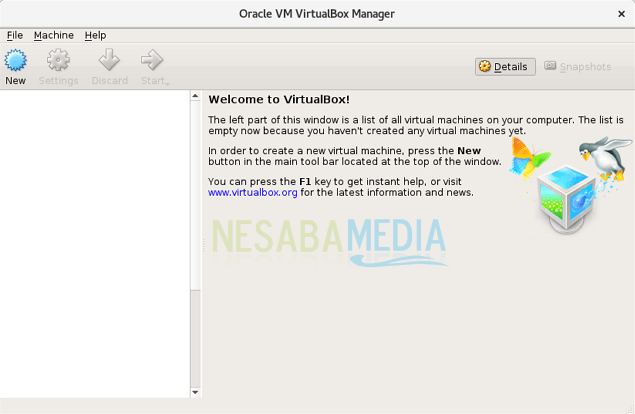
1. Klik Tombol “New”
Langkah pertama untuk membuat mesin virtual adalah dengan meng-klik tombol “New” pada bagian atas kiri layar atau dengan shortcut Ctrl + N.

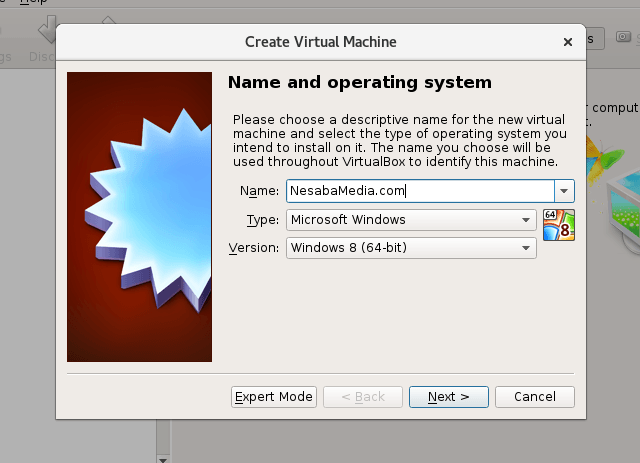
2. Name And Operating System
Setelah mengklik “New” anda akan diminta untuk memasukkan Nama, Type dan Version virtual machine anda. Masukkan Type & Version sesuai dengan OS yang anda ingin instal nantinya. Setelah selesai klik Next.


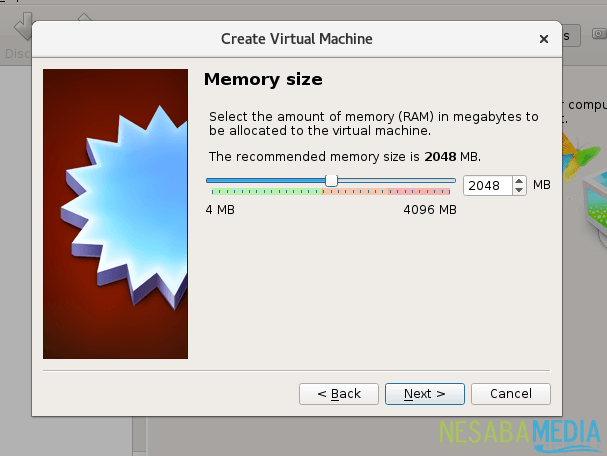
3. Memory Size
Pada layar selanjutnya anda akan diminta untuk menentukan ukuran RAM yang akan di alokasikan untuk mesin virtual. Virtualbox memberikan rekomendasi ukuran berdasarkan sistem operasi yang akan di install, namun anda dapat menyesuaikan sesuai dengan kebutuhan anda. 
Semakin besar RAM yang anda alokasikan makan semakin lancar pula virtual machine anda. Namun anda perlu untuk menyisakan beberapa, agar sistem operasi reguler anda dapat tetap berjalan. Setelah selesai klik Next.


4. Membuat Harddisk Virtual
Langkat selanjutnya adalah membuat harddisk virtual yang akan digunakan untuk menginstall sistem operasi dan program pada mesin virtual anda nantinya. Terdapat 3 opsi pengaturan yang bisa anda gunakan :
Do not add a virtual hard disk
Opsi ini digunakan untuk tingkat mahir dimana hard disk virtual akan dibuat dalam pengaturan terpisah setelah pembuatan mesin virtual selesai.
Create a virtual hard disk now
Opsi ini digunakan untuk membuat hard disk virtual baru bersamaan dengan pembuatan mesin vitual.
Use an existing virtual hard disk file
Opsi ini digunakan untuk menggunakan hard disk virtual yang sudah pernah anda buat.
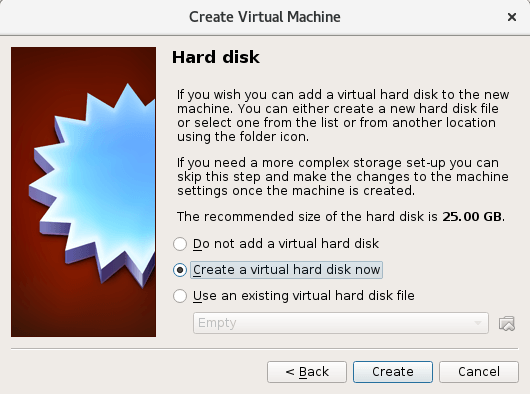

Untuk saat ini karena anda belum memiliki hard disk vitual maka pilih Create a virtual hard disk now dan tekan Create.

5. Pilih tipe file hard disk yang akan kita gunakan.
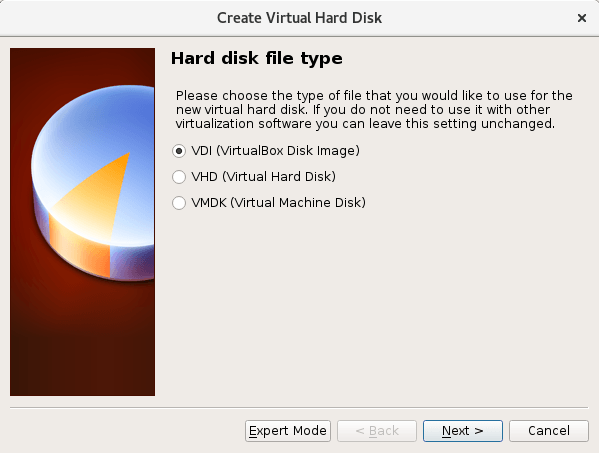

Terdapat 3 tipe file hard disk yaitu :
  • VDI (Virtualbox Disk Image) adalah format native dari Virtual Box
  • VHD (Virtual Hard Disk) adalah format native dari Microsoft Virtual PC
  • VMDK (Virtual Machine Disk) adalah format native dari VMWare
Jika anda tidak ingin menggunakannya untuk software virtualisasi lainnya pilih “VDI (VirtualBox Disk Image)”. Kemudian pilih Next >.

6. Storage on Physical Hard Disk
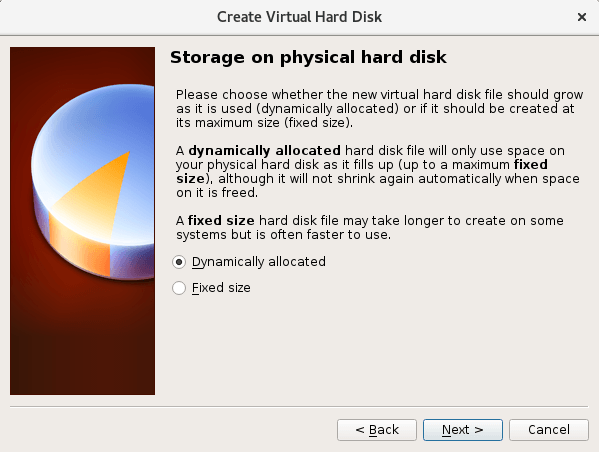
Pada langkah selanjutnya anda akan diminta untuk memilih bagaimana virtual hard disk tersimpan pada hard disk fisik anda. Terdapat dua opsi pengaturan yaitu :
Dynamically Allocated
Menggunakan kapasitas hard disk fisik berdasarkan jumlah hard disk virtual, tidak berdasarkan ukuran yang telah di tentukan.
Fixed Size
kapasitas hard disk fisik yang digunakan berdasarkan kapasitas hard disk virtual yang dibuat.
Pilih sesuai kebutuhan anda (direkomendasikan menggunakan Dynamically Allocated) dan kemudian pilih Next >.

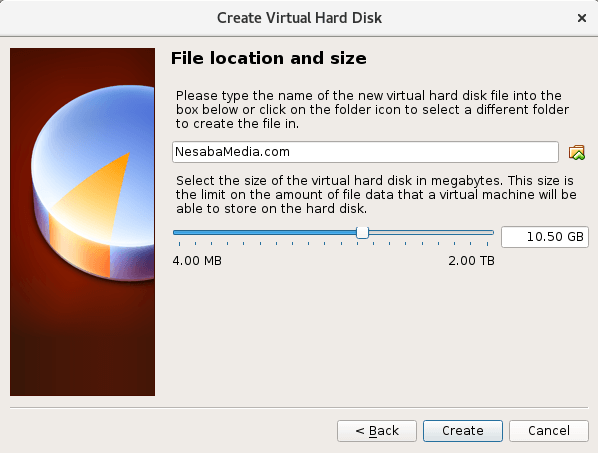
7. File Location And Size
Pada langkah terakhir adalah menentukan Lokasi & Ukuran hard disk virtual anda. Silahkan atur sesuai dengan kebutuhan anda. Ada baiknya anda menyesuaikan dengan system requirement dari OS yang akan di install. Setelah selesai klik Create maka mesin virtual anda telah berhasil dibuat.


C. Menjalankan Virtual Machine

Setelah selesai membuat virtual machine yang harus anda lakukan selanjutnya yaitu menjalankannya dengan mengklik tombol Start.
Saat pertama kali anda menjalankan virtual machine, anda tetap harus menginstall sistem operasinya, sama seperti pada komputer biasa, ini berarti anda harus menyiapkan DVD instalasi atau file ISO sistem operasi anda. 
Pastikan Type & Version ISO yang anda punya sama dengan yang sudah anda atur di Langkah 2 pada Membuat Virtual Machine.
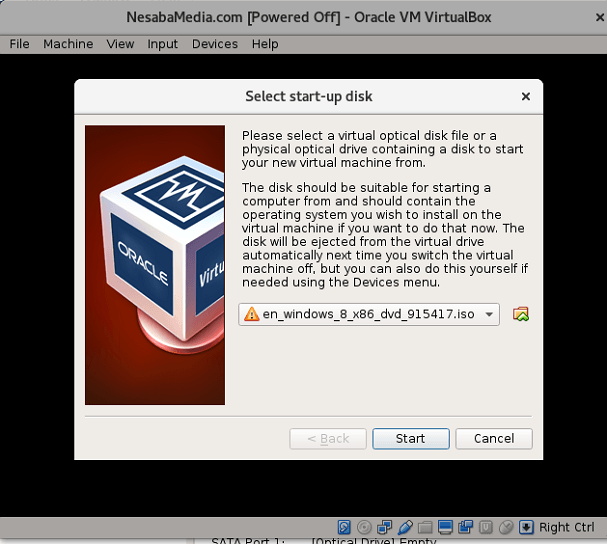

Setelah menentukan lokasi file ISO, langkah selanjutnya adalah klik Start dan lakukan instalasi OS seperti pada tutorial yang telah ditulis sebelumnya :
Bagaimana mudah bukan? Sekarang anda dapat menjalankan 2 sistem operasi atau lebih tanpa harus dual boot. Anda dapat mengeksplore berbagai macam sistem operasi tanpa harus takut file yang di dalam hard disk anda terhapus.

https://www.nesabamedia.com/cara-menggunakan-virtualbox/

How to Extract First, Middle and Last Name from One Cell Into Separate Cells In Excel

May 17, 2016 Add Comment

In this article we will show you how to extract First, Middle & Last Name from a given text string using multiple methods in Microsoft Excel.
Many a times you face a situation where in you are given a name list containing full names and you need to separate them on the basis of first, middle and last name and then return the result into different cells. This is a very common problem for any excel user, and you too must have come across it.
This is a very common distress for a lot of Excel users but there is no specific in-built function in Excel that can extract first name, middle initial and last name from a cell that contains a complete name.
But, there are multiple methods in Excel that can help you in doing the same. And, that’s what this article lesson is about.
Today, we will show you two different methods that can be used for splitting names into different cells.
The most common way in which Excel stores name is by taking the first name first, space then middle initial (if any) followed by space and then the last name. Sometimes, instead of spaces, comma is used for separations.
Moving on to the first example, as you can see there are a few names in “column A” that we want to extract and return in column B, C and, D as first name, middle initial and last name respectively.

Example 1
Note: Random sample names are used in this tutorial, just to explain how to extract values and return them in different columns.
Note that random sample names are used in this tutorial, just to explain how to extract values and return them in different columns.

Here, we will use the “Text to Column” feature which is used to separate simple cell content as first name and last name into separate columns. This feature is located under “Data” tab in “Data Tools” category. And, you can also use the keyboard shortcut “ALT + D + E” (Learn more Keyboard Shortcuts) to access the “Text to Column” wizard.

Select the range from A9 to A17 and then press “ALT + D + E”.

Note that random sample names are used in this tutorial, just to explain how to extract values and return them in different columns.

And, now we need to follow 3 easy steps, and as you can see on top of the wizard box, we are at the first step. 
Select “Delimited” 
Click on “Next” 

In the first step, we need to tell Excel that how our data is stored and formatted in the Excel file.

Now, we are in 2nd step of this wizard, and as you can see below, here we need to set the delimiters which our data contains.
Note that random sample names are used in this tutorial, just to explain how to extract values and return them in different columns.

Here you can see few “Delimiters” checkboxes; so, either you can select these check boxes or can mention the delimiter in “Other” checkbox. If your data contain some other delimiters which are not listed here. You can select one or multiple delimiters if there are more than one delimiter in your data.

Note that random sample names are used in this tutorial, just to explain how to extract values and return them in different columns.

Check “Space” delimiter
Then click on “Next”
    Note that random sample names are used in this tutorial, just to explain how to extract values and return them in different columns.
    Moving on to the last step of the “Text to column” wizard. 
    Select “General” in column data format
    Select B9 as “Destination” and lock it
    Click on “Finish”
      Note that random sample names are used in this tutorial, just to explain how to extract values and return them in different columns.

      Note that if you do not specify a new destination cell reference, the extracted columns will replace the original data.

      Now you can see that the names in “column A” have been extracted in multiple columns. But, if you look closely you will notice that in the 11th row, “Steve Smith” does not have a middle initial and his last name is moved to the middle name column.

      Note that random sample names are used in this tutorial, just to explain how to extract values and return them in different columns.

      That’s because, “Text to column” is only used to separate simple content into different cells basis on their delimiters. And, as there is only a single space in his name, it got split only in next 2 cells. This is the only drawback this feature has.

      Example 2
      Note: In the second example, we have taken “Mayor Tom C Bradley as the full name in cell H9, just to show users that when there are more than 1 initials in the middle name, the function will extract both of them.

      Now, we move on to the 2nd example, where we will use multiple functions together to get what we are looking for. This is the advanced technique of extracting “First”, “Middle” and, “Last Name” into different columns. And, to do the same, we have taken similar data in column H and, we are going to have names separated in three parts as First, Middle & Last name in column I, J and, K respectively. B
      Note that random sample names are used in this tutorial, just to explain how to extract values and return them in different columns.

      This is the best solution to consider when you want to split names into “First”, “Middle” and, “Last” but do not want to repeat the previous method every time you do that. You can put the formulas in the cells and the moment reference cell will be updated, names will be extracted automatically in specific columns where you have entered the formulas.

      To extract First Name 
      Select cell I9 
      Enter following formula without quotation “=LEFT(H9,SEARCH(” “,H9)-1)” 
      Hit Enter
        Note that random sample names are used in this tutorial, just to explain how to extract values and return them in different columns.

        And as you can see, the function has extracted the first name from H9 and returned it in cell I9 with “Mayor”. As you know, LEFT function is used to extract leftmost character and SEARCH function returns the position of the specific character it finds first in the string. So, here SEARCH function found the space first at 6th position in the string and to exclude space, we supplied negative value which helped LEFT to pick up only 5 characters.

        To extract Last Name 
        Select K9 cell 
        Enter following formula with double quotes “=TRIM(RIGHT(SUBSTITUTE(H9,” “,REPT(” “,255)),255))” 
        Hit Enter
          Note that random sample names are used in this tutorial, just to explain how to extract values and return them in different columns.

          To extract the last name, we have nested REPT, and SUBSTITUTE function inside RIGHT function. Then at last, we nested all conditions into TRIM to remove all unwanted spaces. Let’s see how all these statements worked together to return the last name.


          REPT is nested inside SUBSTITUTE which repeated single space 255 times, and then SUBSTITUTE replaced single space with 255 spaces in the supplied string. And now each initial is separated by 255 spaces and then RIGHT function is used to extract topmost 255 characters and then TRIM is used to remove all extra spaces and then return with only last initial of the name.

          To extract Middle Name 
          Now select J9 cell 
          Enter following formula without double quotes “=IF(LEN(H9)-LEN(SUBSTITUTE(H9,” “,””))>1,TRIM(SUBSTITUTE(SUBSTITUTE(H9,I9,””),K9,””)),””)” 
          Hit Enter
            Note that random sample names are used in this tutorial, just to explain how to extract values and return them in different columns.

            Update: In case you have to separate middle name which is same as the first or last name, use the following formula in column J instead of the formula mentioned above.=TRIM(MID(H9,LEN(I9)+1,LEN(H9)-LEN(I9)-LEN(K9)))
            Extracting middle initial looks quite difficult as we need to make sure that the function evaluates all conditions and extract only middle name from it. For that, we have nested LEN, SUBSTITUTE, TRIM functions inside IF
            In the first argument of IF function, logical test is checking that the length of the string without space when subtracting from the total length of the string is greater than 1 or not. When the result is TRUE, function execute the TRUE condition where SUBSTITUTE is nested inside SUBSTITUTE. Nested SUBSTITUTE is replacing the value of column I with empty text in column H and then the main SUBSTITUTE is replacing column K’s value with empty text and then to remove not required spaces, TRIM is used. And, in case IF condition does not meet the logical test, then the function would return empty text.

            This is how you can use customize functions & simple methods to extract “First Name”, “Middle Initial” & “Last Name” from cell that contains a full name.