Showing posts with label ISO. Show all posts

Cara Mount dan Unmount ISO File di Windows

September 16, 2019 Add Comment

ISO file tidak banyak dibicarakan saat ini seperti lima atau sepuluh tahun yang lalu, tetapi mereka memiliki kegunaannya. ISO adalah file disc image, menyimpan semua data yang anda temukan pada CD, DVD, atau USB drive, dan akan berperilaku seperti itu pada disk - dengan fitur autoplay dan semuanya.

Mount adalah proses membuat drive CD/DVD virtual pada komputer anda sehingga dapat menjalankan file ISO seperti halnya disk drive. Sementara itu Unmount seperti menekan tombol Eject pada disk drive anda untuk mengeluarkannya.

Dalam artikel ini saya akan menunjukkan kepada anda bagaimana melakukan kedua hal ini hanya dengan menggunakan tools yang terdapat dalam Windows.


Cara Mount ISO File

Kita berasumsi bahwa anda telah membuat file ISO yang ingin anda pasang, atau setidaknya anda memiliki file ISO yang dipermasalahkan di komputer anda dan siap digunakan.

Jadi anda memiliki file ISO anda - DVD, software disc image, game, atau apapun dan anda ingin menjalankannya. Meskipun di masa lalu anda memerlukan software khusus untuk ini - mis. Daemon Tools, sekarang yang perlu anda lakukan adalah yang berikut.

1. Klik kanan file ISO dan klik Mount atau anda juga dapat mengklik doble pada file ISO.


2. Ketika anda melakukan ini, konten ISO itu harus segera terbuka dan muncul di Windows Explorer seperti di folder lama manapun. Sementara itu panel di sebelah kiri Windows Explorer di bawah dropdown This PC akan menampilkan ikon drive DVD/CD atau sejenis lainnya dengan nama ISO di sebelahnya.


Ini berarti file anda telah terpasang.

Jika, misalnya, ISO memiliki fungsi autoplay, maka anda dapat mengklik kanan ikon drive DVD dan Autoplay akan muncul. Demikian juga, jika gambar tersebut adalah direct DVD/movie image maka anda dapat mengklik kanan, dan anda akan mendapatkan opsi untuk memutarnya dengan software DVD pilihan anda. Anda tidak dibatasi hanya menjelajah file-file ISO.


Cara UnMount ISO File

Untuk setiap mount perlu ada unmount atau sesuatu untuk efek itu. Seperti yang saya sebutkan sebelumnya, unmount pada dasarnya adalah hal yang sama seperti mengeluarkan disk anda dari drive dengan perbedaan tambahan bahwa seluruh drive menghilang dari PC anda ketika anda mengeluarkan. Melakukan ini adalah hal sederhana.

1. Klik kanan pada ikon drive DVD dan klik Eject.


2. Itu dia. File ISO yang anda mount sekarang akan hilang bersama dengan drive DVD virtual.


Kelebihan dari proses ini adalah anda dapat memasang lebih dari 10 file ISO secara bersamaan pada PC Windows anda, meskipun bagian This PC anda pasti akan terlihat berantakan karena hal itu. Jika anda ingin menjaga segalanya tetap rapi di Explorer anda, anda dapat unmount setelah anda menggunakannya.

Sekian tutorial kali ini. Semoga bermanfaat dan menambah pengetahuan anda. Anda juga dapat merequest tutrial apa yang anda butuhkan dengan meninggalkan komentar anda dibawah. Terimakasih dan GBU.

AnyToISO Pro 3.9.3 Build 631 Full Patch (AIO)

September 04, 2018 Add Comment
AnyToISO Pro 3.9.3 Build 631 Full Patch (AIO) | by EWORA

AnyToISO Pro 3.9.3 Build 631 Full Patch (AIO)

AnyToISO is the ultimate ISO Creator for Windows. It can create ISO from almost everything including all CD/DVD/BD images formats popular in Internet (NRG, MDF, UIF, DMG, ISZ, BIN, DAA, PDI, CDI, IMG, etc), CD/ DVD/ Blue-ray disks or simply from a local folder.

AnyToISO also can extract any of those formats plus ISO/ DEB/ RPM images. Most CD/DVD burning software works with ISO images and its native images only. Use the program for conversion before burning, because AnyToISO supports all CD/DVD/BD formats popular in Internet.

With AnyToISO you can mount any CD, DVD or Blu-Ray image found in Internet to your Parallels/ VMWare virtual machine. Complete command line support.

This program is available in two editions: Lite and Pro (Professional). Lite version is totally free but it cannot deal with files greater than a normal CD size (870 MB).

In order to work with DVD/Blue-ray images one should upgrade to a Pro version. Pro version customers have the highest priority level in technical support. Windows version can also be portable.


AnyToISO Pro 3.9.3 Build 631

AnyToISO Features :

  • Extract/Convert to ISO : NRG, MDF, UIF, DMG, ISZ, BIN, DAA, PDI, CDI, IMG, etc CD/DVD-ROM images
  • Extract ISO, DMG, DEB, RPM… files
  • Create ISO from CD/DVD/Blu-ray disks (BIN/CUE also supported)
  • Create ISO from files/folders
  • Integration with Explorer and Apple Finder
  • Command line support
  • Free Lite version

Changes in version 3.9.3 (July 30, 2018) :

  • Small improvements related to correct handling of DMG files

DOWNLOAD(12.5 MB)

DOWNLOAD(12.5 MB)

System Requirements

  • Microsoft® Windows® XP, Windows® Vista, Windows® 7 (SP1), Windows® 8, Windows® 8.1 & Windows® 10 (32-bit, 64-bit All Editions)
  • Computer with Resonable Speed
  • 50 MB of free Disk Space

How to Install

  1. Unpack and Run Software
  2. Choose Setup and Install
  3. After Install Don’t Launch or Run Application
  4. Choose Patch and Run Click Patch
  5. That’s All, Enjoy

AnyToISO Pro 3.9.3 Build 631 Full Patch (AIO) | by EWORA
AnyToISO Pro 3.9.3 Build 631 Full Patch (AIO)

Team BurnBurnBurn AnyToISO v3.x | Patch

AnyToISO Pro 3.9.3 Build 631 | Main Page

AnyToISO Pro 3.9.3 Build 631 | License Activated

AnyToISO Pro 3.9.3 Build 630 Full Patch (AIO)

July 31, 2018 Add Comment
AnyToISO Pro 3.9.3 Build 630 Full Patch (AIO) | by EWORA

AnyToISO Pro 3.9.3 Build 630 Full Patch (AIO)

AnyToISO is the ultimate ISO Creator for Windows. It can create ISO from almost everything including all CD/DVD/BD images formats popular in Internet (NRG, MDF, UIF, DMG, ISZ, BIN, DAA, PDI, CDI, IMG, etc), CD/ DVD/ Blue-ray disks or simply from a local folder.

AnyToISO also can extract any of those formats plus ISO/ DEB/ RPM images. Most CD/DVD burning software works with ISO images and its native images only. Use the program for conversion before burning, because AnyToISO supports all CD/DVD/BD formats popular in Internet.

With AnyToISO you can mount any CD, DVD or Blu-Ray image found in Internet to your Parallels/ VMWare virtual machine. Complete command line support.

This program is available in two editions: Lite and Pro (Professional). Lite version is totally free but it cannot deal with files greater than a normal CD size (870 MB).

In order to work with DVD/Blue-ray images one should upgrade to a Pro version. Pro version customers have the highest priority level in technical support. Windows version can also be portable.


AnyToISO Pro 3.9.3 Build 630

AnyToISO Features :

  • Extract/Convert to ISO : NRG, MDF, UIF, DMG, ISZ, BIN, DAA, PDI, CDI, IMG, etc CD/DVD-ROM images
  • Extract ISO, DMG, DEB, RPM… files
  • Create ISO from CD/DVD/Blu-ray disks (BIN/CUE also supported)
  • Create ISO from files/folders
  • Integration with Explorer and Apple Finder
  • Command line support
  • Free Lite version

Changes in version 3.9.3 (July 30, 2018) :

  • Small improvements related to correct handling of DMG files

DOWNLOAD(12.5 MB)

System Requirements

  • Microsoft® Windows® XP, Windows® Vista, Windows® 7 (SP1), Windows® 8, Windows® 8.1 & Windows® 10 (32-bit, 64-bit All Editions)
  • Computer with Resonable Speed
  • 50 MB of free Disk Space

How to Install

  1. Unpack and Run Software
  2. Choose Setup and Install
  3. After Install Don’t Launch or Run Application
  4. Choose Patch and Run Click Patch
  5. That’s All, Enjoy

AnyToISO Pro 3.9.3 Build 630 Full Patch (AIO) | by EWORA
AnyToISO Pro 3.9.3 Build 630 Full Patch (AIO)

Team BurnBurnBurn AnyToISO v3.x | Patch

AnyToISO Pro 3.9.3 Build 630 | Main Page

AnyToISO Pro 3.9.3 Build 630 | Registered

Panduan Pemula: Cara Menggunakan Virtualbox untuk Instalasi Windows dan OS Lain

July 27, 2018 Add Comment

Virtualbox adalah sebuah mesin virtual bersifat open source yang berfungsi sebagai mesin virtualisasi untuk menginstall OS (Operation System) sehingga memungkinkan anda untuk menjalankan beberapa OS tanpa harus dual boot dan tanpa harus takut kehilangan data sistem anda.

Hal ini penting jika anda ingin melakukan uji coba atau simulasi instalasi sebuah sistem operasi. Dan pada kesempatan ini saya akan menjelaskan bagaimana cara menggunakan virtualbox ini, mulai dari proses instalasi sampai pada pembuatan virtual machine. Baiklah lansung saja kita bahas satu per satu.

A. Instalasi VirtualBox

1. Download Virtual Box
Pertama sebelum kita melakukan instalasi, tentu kita harus mendownload file instalasi virtual box terlebih dahulu, anda dapat mendownloadnya secara gratis melalui link berikut ini. Pilih paket sesuai dengan sistem operasi yang anda gunakan dan kemudian download.

2. Install virtualbox
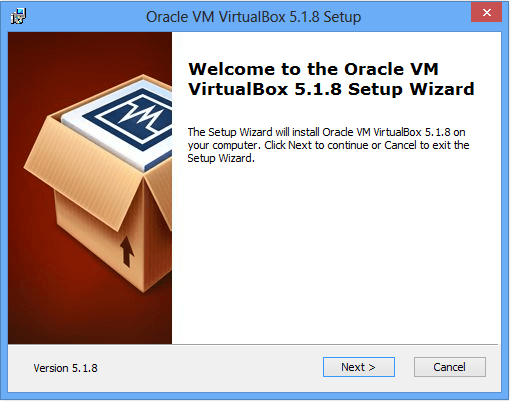
Setelah selesai download, lakukan install virtualbox anda dengan mengklik dua kali file exe sehingga jendela selamat datang (Welcome to the Oracle VM VirtualBox 5.1.8 Setup Wizard ) terbuka. Klik Next >.


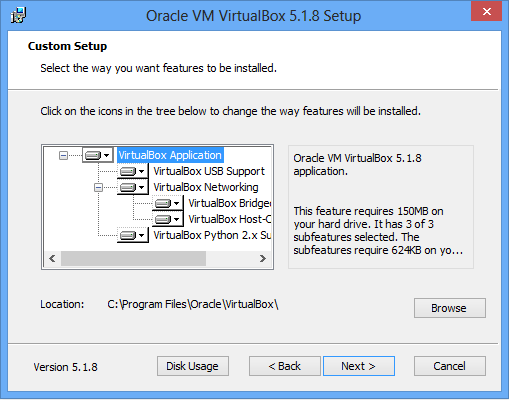
3. Memilih Fitur yang Diinstal
Pada jendela Custom Setup, gunakan pengaturan defaultnya saja. Kemudian klik Next >.


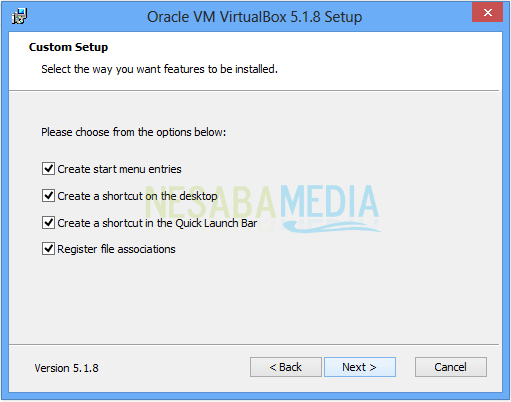
4. Opsi Pilihan Shortcut
Pada jendela selanjutnya terdapat beberapa opsi pilihan mengenai shortcut untuk mengakses virtual box anda. Silahkan checklist semua lalu kemudian klik Next >.


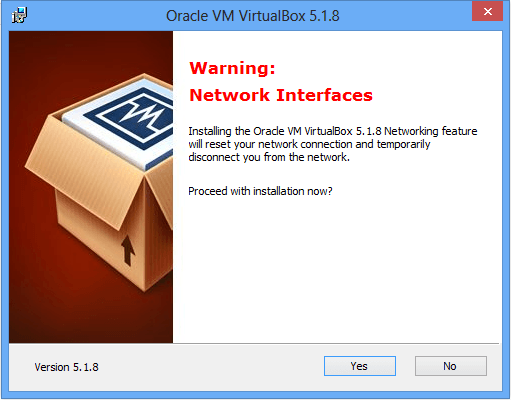
5. Peringatan Network Interfaces
Di jendela berikutnya akan muncul peringatan bahwa untuk menginstal fitur Virtual Box Networking akan memutuskan anda dari koneksi jaringan untuk sementara. Bila anda setuju anda dapat melanjutkan instalasi dengan mengklik Yes.


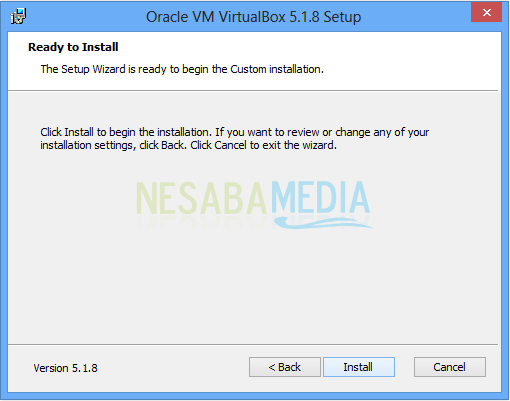
6. Ready to Install
Pada jendela terakhir, virtualbox anda telah siap untuk di install. Untuk menyelesaikannya klik Install dan tunggu hingga proses instalasi selesai.


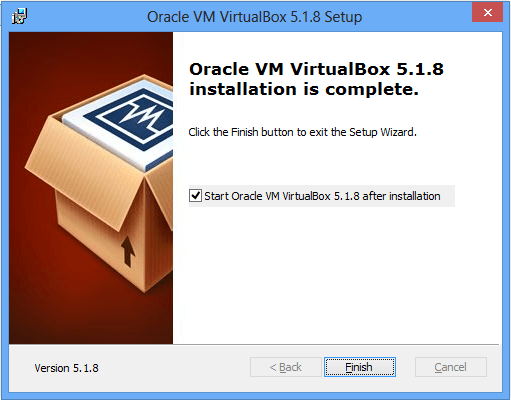
7. Installation Is Complete
Setelah proses instalasi selesai pada bagian terakhir terdapat pemberitahuan bahwa proses instalasi telah selesai. Untuk membuka Virtualbox anda, silakan checklist “Start Oracle VM Virtualbox 5.18 After Installation” dan klik Finish.


B. Membuat Virtual Machine

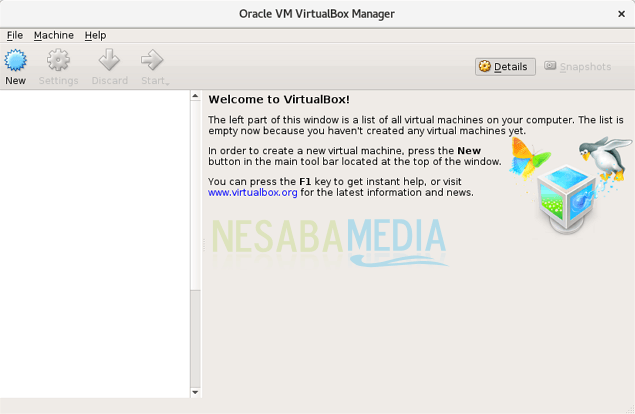
1. Klik Tombol “New”
Langkah pertama untuk membuat mesin virtual adalah dengan meng-klik tombol “New” pada bagian atas kiri layar atau dengan shortcut Ctrl + N.


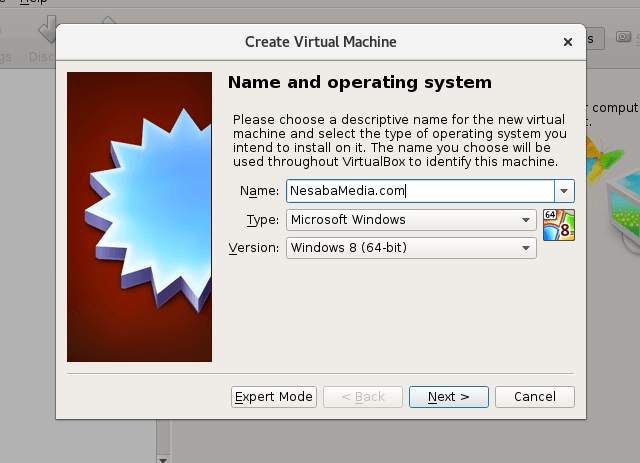
2. Name And Operating System
Setelah mengklik “New” anda akan diminta untuk memasukkan Nama, Type dan Version virtual machine anda. Masukkan Type & Version sesuai dengan OS yang anda ingin instal nantinya. Setelah selesai klik Next.


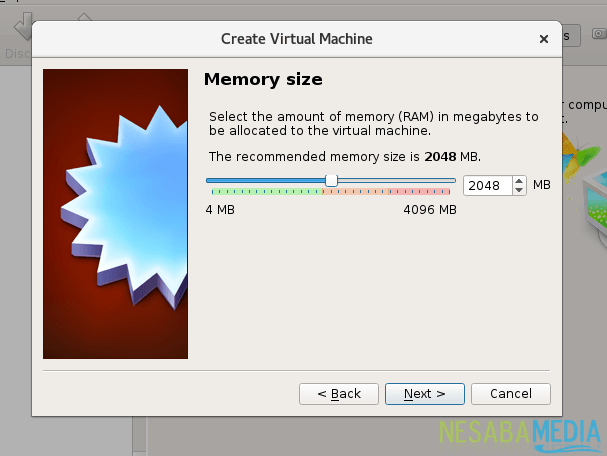
3. Memory Size
Pada layar selanjutnya anda akan diminta untuk menentukan ukuran RAM yang akan di alokasikan untuk mesin virtual. Virtualbox memberikan rekomendasi ukuran berdasarkan sistem operasi yang akan di install, namun anda dapat menyesuaikan sesuai dengan kebutuhan anda. 
Semakin besar RAM yang anda alokasikan makan semakin lancar pula virtual machine anda. Namun anda perlu untuk menyisakan beberapa, agar sistem operasi reguler anda dapat tetap berjalan. Setelah selesai klik Next.


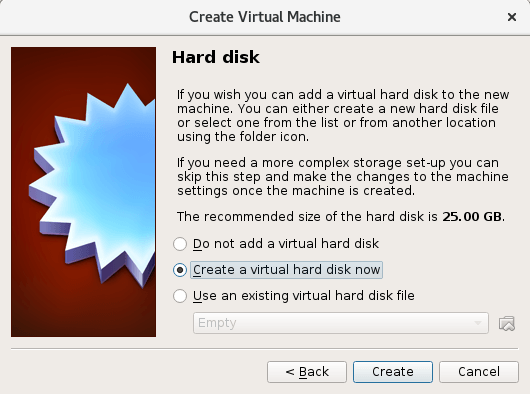
4. Membuat Harddisk Virtual
Langkat selanjutnya adalah membuat harddisk virtual yang akan digunakan untuk menginstall sistem operasi dan program pada mesin virtual anda nantinya. Terdapat 3 opsi pengaturan yang bisa anda gunakan :
Do not add a virtual hard disk
Opsi ini digunakan untuk tingkat mahir dimana hard disk virtual akan dibuat dalam pengaturan terpisah setelah pembuatan mesin virtual selesai.
Create a virtual hard disk now
Opsi ini digunakan untuk membuat hard disk virtual baru bersamaan dengan pembuatan mesin vitual.
Use an existing virtual hard disk file
Opsi ini digunakan untuk menggunakan hard disk virtual yang sudah pernah anda buat.


Untuk saat ini karena anda belum memiliki hard disk vitual maka pilih Create a virtual hard disk now dan tekan Create.

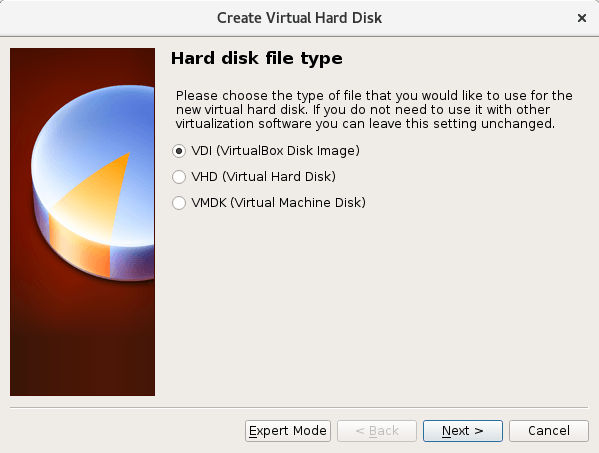
5. Pilih tipe file hard disk yang akan kita gunakan.


Terdapat 3 tipe file hard disk yaitu :
  • VDI (Virtualbox Disk Image) adalah format native dari Virtual Box
  • VHD (Virtual Hard Disk) adalah format native dari Microsoft Virtual PC
  • VMDK (Virtual Machine Disk) adalah format native dari VMWare
Jika anda tidak ingin menggunakannya untuk software virtualisasi lainnya pilih “VDI (VirtualBox Disk Image)”. Kemudian pilih Next >.

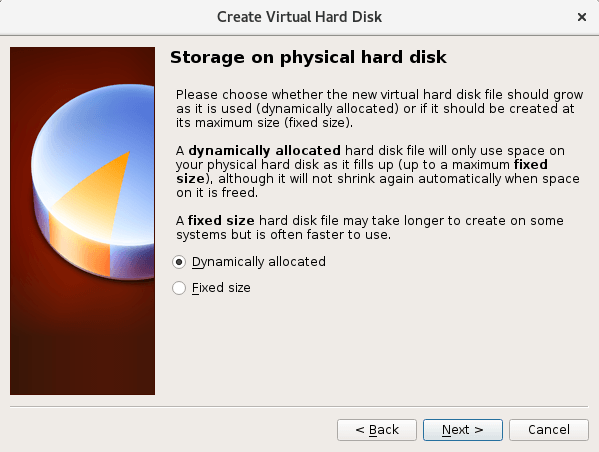
6. Storage on Physical Hard Disk
Pada langkah selanjutnya anda akan diminta untuk memilih bagaimana virtual hard disk tersimpan pada hard disk fisik anda. Terdapat dua opsi pengaturan yaitu :
Dynamically Allocated
Menggunakan kapasitas hard disk fisik berdasarkan jumlah hard disk virtual, tidak berdasarkan ukuran yang telah di tentukan.
Fixed Size
kapasitas hard disk fisik yang digunakan berdasarkan kapasitas hard disk virtual yang dibuat.
Pilih sesuai kebutuhan anda (direkomendasikan menggunakan Dynamically Allocated) dan kemudian pilih Next >.


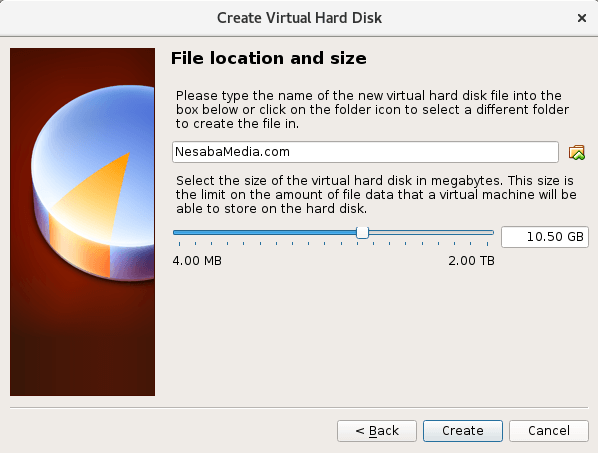
7. File Location And Size
Pada langkah terakhir adalah menentukan Lokasi & Ukuran hard disk virtual anda. Silahkan atur sesuai dengan kebutuhan anda. Ada baiknya anda menyesuaikan dengan system requirement dari OS yang akan di install. Setelah selesai klik Create maka mesin virtual anda telah berhasil dibuat.


C. Menjalankan Virtual Machine

Setelah selesai membuat virtual machine yang harus anda lakukan selanjutnya yaitu menjalankannya dengan mengklik tombol Start.
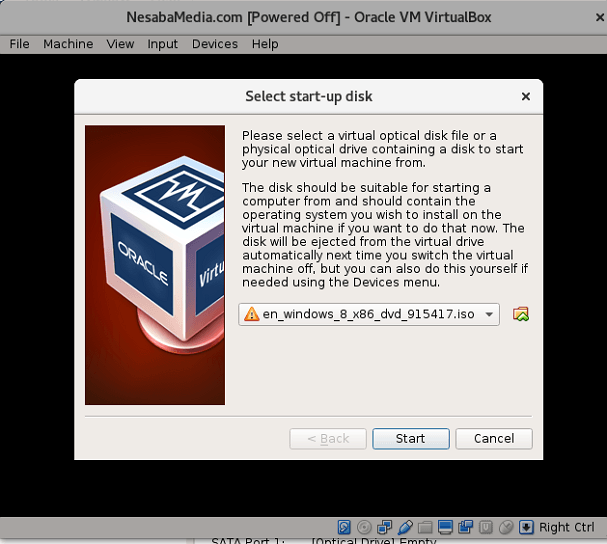
Saat pertama kali anda menjalankan virtual machine, anda tetap harus menginstall sistem operasinya, sama seperti pada komputer biasa, ini berarti anda harus menyiapkan DVD instalasi atau file ISO sistem operasi anda. 
Pastikan Type & Version ISO yang anda punya sama dengan yang sudah anda atur di Langkah 2 pada Membuat Virtual Machine.


Setelah menentukan lokasi file ISO, langkah selanjutnya adalah klik Start dan lakukan instalasi OS seperti pada tutorial yang telah ditulis sebelumnya :
Bagaimana mudah bukan? Sekarang anda dapat menjalankan 2 sistem operasi atau lebih tanpa harus dual boot. Anda dapat mengeksplore berbagai macam sistem operasi tanpa harus takut file yang di dalam hard disk anda terhapus.

https://www.nesabamedia.com/cara-menggunakan-virtualbox/

AnyToISO Pro 3.9.2 Build 620 Full Crack (AIO)

July 15, 2018 Add Comment
AnyToISO Pro 3.9.2 Build 620 Full Crack (AIO) | by EWORA

AnyToISO Pro 3.9.2 Build 620 Full Crack (AIO)

AnyToISO is the ultimate ISO Creator for Windows. It can create ISO from almost everything including all CD/DVD/BD images formats popular in Internet (NRG, MDF, UIF, DMG, ISZ, BIN, DAA, PDI, CDI, IMG, etc), CD/ DVD/ Blue-ray disks or simply from a local folder.

AnyToISO also can extract any of those formats plus ISO/ DEB/ RPM images. Most CD/DVD burning software works with ISO images and its native images only. Use the program for conversion before burning, because AnyToISO supports all CD/DVD/BD formats popular in Internet.

With AnyToISO you can mount any CD, DVD or Blu-Ray image found in Internet to your Parallels/ VMWare virtual machine. Complete command line support.


AnyToISO Pro 3.9.2 Build 620

This program is available in two editions: Lite and Pro (Professional). Lite version is totally free but it cannot deal with files greater than a normal CD size (870 MB).

In order to work with DVD/Blue-ray images one should upgrade to a Pro version. Pro version customers have the highest priority level in technical support. Windows version can also be portable.

AnyToISO Features :

  • Extract/Convert to ISO : NRG, MDF, UIF, DMG, ISZ, BIN, DAA, PDI, CDI, IMG, etc CD/DVD-ROM images
  • Extract ISO, DMG, DEB, RPM… files
  • Create ISO from CD/DVD/Blu-ray disks (BIN/CUE also supported)
  • Create ISO from files/folders
  • Integration with Explorer and Apple Finder
  • Command line support
  • Free Lite version

Changes in Version 3.9.2 (July 13, 2018) :

  • New : Support of APFS file system inside DMG files
  • Improved : Correct handling of symbolic links when extracting DMG files
  • Improved : Support of DMG files inside ipsw iOS firmware images

DOWNLOAD(14.1 MB)

DOWNLOAD(14.1 MB)

System Requirements

  • Microsoft® Windows® XP, Windows® Vista, Windows® 7 (SP1), Windows® 8, Windows® 8.1 & Windows® 10 (32-bit, 64-bit All Editions)
  • Computer with Resonable Speed
  • 50 MB of free Disk Space

How to Install

  1. Unpack and Run Software
  2. Choose Setup and Install
  3. After Install Don’t Launch or Run Application
  4. Choose Crack and Click Ectract to the Directory
  5. That’s All, Enjoy

AnyToISO Pro 3.9.2 Build 620 Full Crack (AIO) | by EWORA
AnyToISO Pro 3.9.2 Build 620 Full Crack (AIO)

AnyToISO Pro 3.9.2 | Crack

AnyToISO Pro 3.9.2 Build 620 | Main Page

AnyToISO Pro 3.9.2 Build 620 | About Version

PowerISO 7.2 Full Crack (x86,x64) (AIO)

June 28, 2018 Add Comment
PowerISO 7.2 Full Crack (x86,x64) (AIO) | by EWORA

PowerISO 7.2 Full Crack (x86,x64) (AIO)

PowerISO is a powerful image processing and file compression tool. It allows you to create, extract, compress, edit and convert ISO/BIN image files, and mount these files with internal virtual drive.

And most of all, the compressed files can be used directly without decompressing. The program can process almost all CD / DVD / BD image files including ISO and BIN files.

PowerISO provides an all-in-one solution. You can do every thing with your ISO files and disc image files.

PowerISO support almost all CD/DVD-ROM image file formats (ISO, BIN, NRG, IMG, DAA and so on).

Note: DAA (Direct-Access-Archive) is an advanced format for image file, which supports some advanced features, such as compression, password protection, and splitting to multiple volumes. It can be handled directly just like other formats, such as ISO, BIN


PowerISO 7.2

PowerISO Main Features

  • Support almost all CD / DVD / BD-ROM image file formats (ISO, BIN, NRG, CDI, DAA and so on)
  • Open and extract ISO file. You can extract ISO file with a single click
  • Burn ISO file to CD, DVD, or Blu-Ray disc. With this tool, you can create Audio CD, Data CD, Data DVD, Video DVD or VCD. The program also supports Blu-Ray burning
  • Burn Audio CD from MP3, FLAC, APE, WMA, or BIN files
  • Rip Audio CD to MP3, FLAC, APE, WMA, or BIN files
  • Create ISO file or BIN file from hard disk files or CD / DVD / BD discs
  • Edit ISO image file directly
  • Mount ISO file with internal virtual drive. PowerISO can mount all popular disc image files to built-in virtual drive
  • Convert image files between ISO / BIN and other formats. PowerISO can not only convert BIN to ISO, but also convert almost all image file formats to standard ISO image file
  • Create bootable USB drive. The program allows you to setup Windows through USB drive
  • Make bootable ISO file and create bootable CD, DVD disc
  • Support both 32-bit and 64-bit Windows
  • Can be used easily. PowerISO supports shell integration, context menu, drag and drop, clipboard copy past
  • Supported Languages : English, Arabic, Bulgarian, Chinese Simplified, Chinese Traditional, Croatian, Czech, Danish, Dutch, Farsi, French, German, Greek, Hungarian, Italian, Japanese, Korean, Lithuanian, Norsk, Polish, Portuguese, Russian, Slovenian, Spanish, Swedish, Thai, Turkish, Ukrainian, Belarusian

DOWNLOAD(12.9 MB)

DOWNLOAD(12.9 MB)

DOWNLOAD(12.9 MB)

DOWNLOAD(12.9 MB)

System Requirements

  • Microsoft® Windows® XP, Windows® Vista, Windows® 7 (SP1), Windows® 8, Windows® 8.1 & Windows® 10 (32-bit, 64-bit All Editions)
  • Intel Pentium 166MHz or Above
  • 64 MB of RAM
  • 128 MB of free Hard-Disk Space

How to Install

  1. Unpack and Run Software
  2. Choose x86 or x64 and Install
  3. After Install Don’t Launch or Run Application
  4. Choose Crack and Run Click Crack
  5. That’s All, Enjoy

PowerISO 7.2 Full Crack (x86,x64) (AIO) | by EWORA
PowerISO 7.2 Full Crack (x86,x64) (AIO)

PowerISO 7.2 | Crack by PiratePC.Net

PowerISO | Main Page

PowerISO | Registered